Why and How to Make Mosaics
2May 4, 2015 by tessaraewilliams
In craft swaps, it is nice to make a mosaic for your partner. A mosaic is a collage of pictures that acts as a jumping-off point for your partner or an illustration of your questionnaire answers. I think these are fun to make and are very helpful in pointing me in the right direction when I’m thinking of ideas. Personally, when I’m making mosaics for swaps, I either include pictures of crafts that I find online that fit the theme and my style or actual photos of my favorite things within the theme. Different strokes for different folks with this; some people prefer their partners to have already made craft items in their mosaics. I personally don’t want to recreate something that’s already been done, so I’m ok with just photographs.
Here’s a sampling of some of my past mosaics.

This mosaic is for a Superhero Miniquilt Swap. I love Batman, particularly in the style of “Batman: the Animated Series,” so I chose pictures that represent that style. These are all photographs, not premade crafts. Made in PicCollage.

This mosaic wasn’t for a swap, it was just to show off the new fabrics I bought! 🙂 Made with InstaFrame.

This mosaic is for a Harry Potter miniquilt swap. Here I used both photos and premade craft pictures. Made in InstaFrame.
My preferred app for mosaic-making is PicCollage. I use InstaFrame on occasion when I just can’t get the layout I’m going for in PicCollage. Both of these apps are available for Apple and Android phones. There are tons of collage-making apps out there. Just experiment, and find the one(s) that work best for you.
How to Make a Mosaic
Since PicCollage is my preferred app, that’s what I will be using in this tutorial. I will be making my mosaic for my #MuppetCraftSwap, which opened today!
1. Download/screencap your pictures. I find pictures on Google, Pinterest, and Instagram. Have some fun looking around and see what you can find!
2. Open your app and get to your workspace. Mine looks like this.
3. The first thing I do is shrink my workspace. Press the bottom left icon.
This will open a new menu. Press the icon of a box with arrows above and below it.
Your workspace is now in Instagram dimensions.
4. Add your photos. As the screen says, tap anywhere to add a photo. You can also click the bottom middle button to add pictures, as well as text, background images, etc.
You can add more than one picture at a time. It will look something like this.
5. Now to organize this chaos. Again, press the bottom left icon. This will take you to all the layouts that will fit the number of pictures you have chosen. Try a couple to find what you like best.

My mosaic now looks like this. As you can see, images aren’t centered, and some pictures are hard to see.
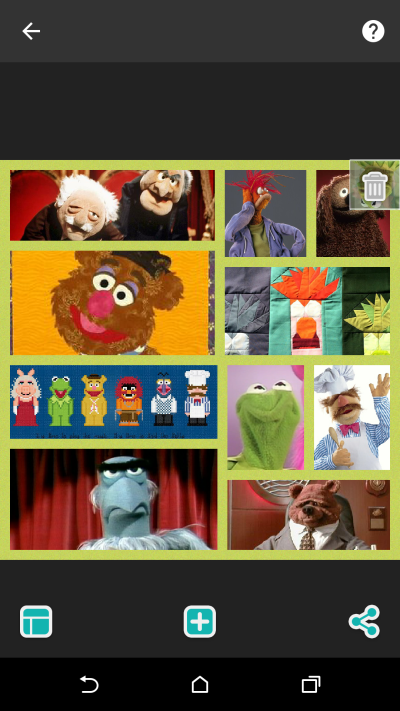
Initially, these pictures will not be centered or highlight the part of the image you want to show. You will need to manually adjust each picture. I decided that I had too many pictures, so I deleted some and rearranged my layout the same way you did the first time you chose a layout. Mine now looks like this.
6. Change the background. Again, bottom left button. Above the icon you clicked to shrink your workspace to square, there is a little square with diagonal lines on it. This is where you can choose a new background color. You can also change the background from the bottom center button as well. I chose a Kermit green for my background.
(PicCollage also lets you search online for background images, which is a feature I use when I make text posts.)
7. You’re done! Now you can save and share your image. Click the bottom right icon. This brings you to a menu where you can choose where you’d like to share your image.
PicCollage can also be used for other things. I use it to make my signs for my swaps or to make text posts.
PicCollage works for me because it will give me a layout when I don’t know how many images I have added. I usually end up taking out some pictures before I’m happy with my mosaic. With InstaFrame, you have to know how many images you have in order to choose a layout, and you often have to choose a nice divisible number of pictures.
There are also ways to make mosaics online. PicMonkey, for example, is a website you can use to make mosaics on your computer.
I hope this is helpful to anyone who isn’t sure how to make mosaics. Once you get the hang of it, they’re really fun to make! Let me know if you have any questions or comments, and tag me on Instagram if you make a mosaic using this tutorial!
If you are interested in joining my #MuppetCraftSwap, click here! Now that you know how to make mosaics, you’re ready to go!
As always, please follow me on Instagram @tessaraewilliams. I post everyday about my projects or what’s on my mind!
Thanks for reading!


[…] Not always mandatory, but always appreciated! Click here to see my post on how to make a […]
LikeLike
[…] he is and why I’m such a fan, that could possibly light the spark to get you going on ideas. Click here to learn how I make my […]
LikeLike